Hardware Library
Contents
These are many interesting inputs and outputs to build tangible interfaces with. Some of the sensors are shown mounted on a small printed circuit board with several pins exposed, which is the best way to get started prototyping.
We link to online stores for convenience, no specific recommendation is intended.
Knobs & Joysticks
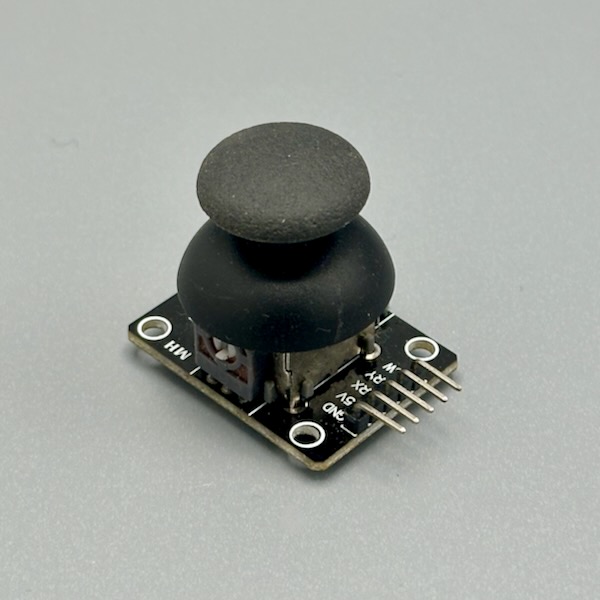
Two potentiometers (X and Y) inside a thumb-sized cap give you full 2D analog control — read them with two analog pins. Push down on the stick and a third pin fires a button click. Map the ranges to cursor movement, robot steering, camera pan/tilt, or character control. Center position reads ~512 on a 10-bit ADC. Photo credit: Steve Turbek
Unlike a potentiometer, an encoder spins forever and counts steps — turn left for −1, right for +1, click the shaft for a button press. Perfect for menu navigation, volume control, or any setting that needs to go up and down without hitting an end stop. Requires interrupt-driven code or frequent polling to catch fast spins reliably. Photo credit: Steve Turbek
Turn it to scroll through options, click to select — and the knob glows whatever color you want. Perfect for a volume knob that turns red when loud or a menu selector that highlights the current choice. It's an encoder (not a potentiometer), so it spins infinitely and counts clicks in either direction. Photo credit: Steve Turbek
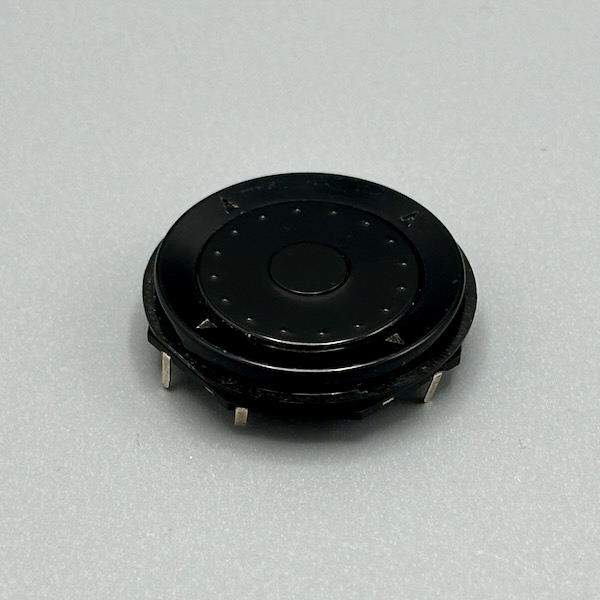
Five directions in one compact rocker: up, down, left, right, and a center push. Each direction is a separate digital output — or the whole thing shares a single analog pin with different resistor values per direction. Salvaged from game controllers and now in module form, it's perfect for menu navigation, robot steering, or any interface that needs cardinal directions plus select. Photo credit: Steve Turbek
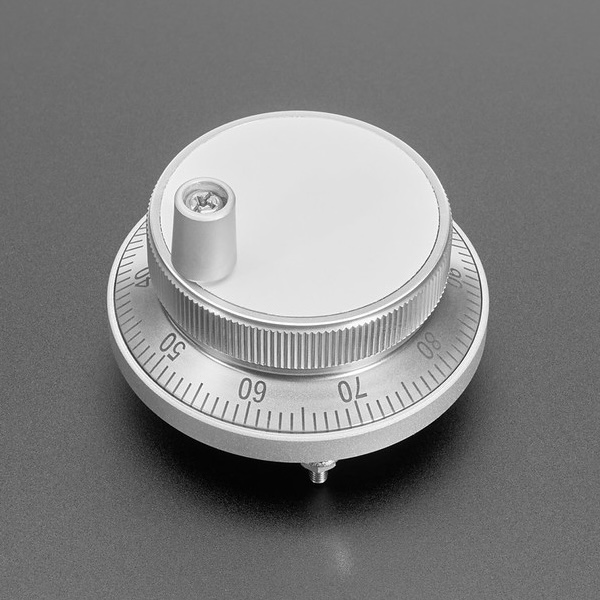
Machined from aluminum with a weighted feel, this CNC machine handwheel is satisfying in a way a plastic knob simply isn't. It's a rotary encoder underneath — so it sends step pulses as you turn, and you can map those to any parameter. The heft and resistance make it feel like you're operating serious equipment, even if you're just scrolling a menu. Photo Credit: adafruit licensed under CC BY-NC-SA 2.0
A slide-style thumb joystick that moves on a flat plane — push left/right and up/down to get two analog values simultaneously. The compact footprint makes it ideal for handheld controllers or embedding in the side of an enclosure where a bulky stick won't fit. Same two-potentiometer wiring as any joystick: two analog reads and you're done. Photo credit: Steve Turbek
Sensors & Inputs
No button needed — any conductive surface connected to the sensor pad acts as a touch input. Wrap foil around a cardboard shape, touch a banana, or make a hidden panel under paper. It outputs a simple HIGH/LOW signal, so it's a drop-in replacement for a button in any sketch. Photo Credit: adafruit licensed under CC BY-NC-SA 2.0
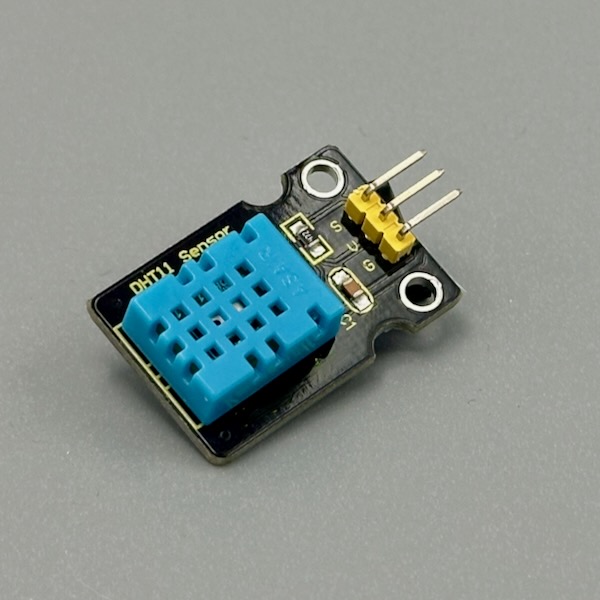
One sensor, two readings — temperature in Celsius and relative humidity as a percentage, delivered over a single data wire. A library call gets you both values in milliseconds. Great for a plant monitor, a bathroom humidity alert, or a cozy "feels like" display. Add a 10kΩ pull-up resistor on the data pin, or grab a module that has it built in. Photo credit: Steve Turbek
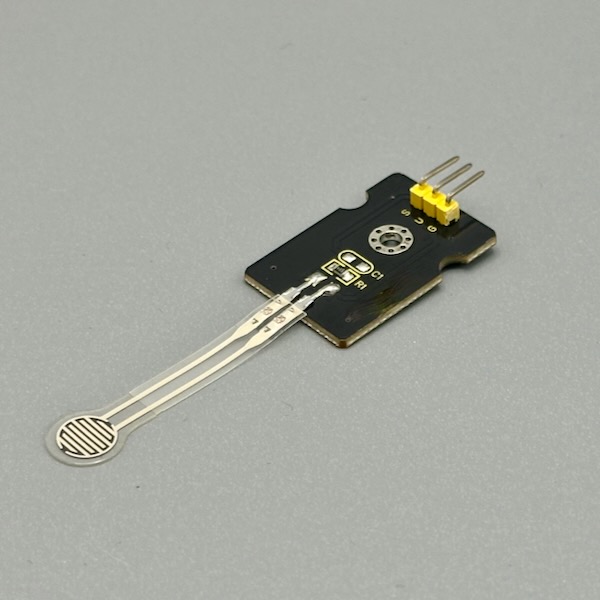
Squeeze it, sit on it, press your thumb into it — resistance drops as force increases. Slip it under a pad, into a glove, or beneath an object to detect presence and pressure level. Use it in a voltage divider with a 10kΩ resistor and read the analog output. Perfect for detecting how hard someone grips, pounds, or leans. Photo credit: Steve Turbek
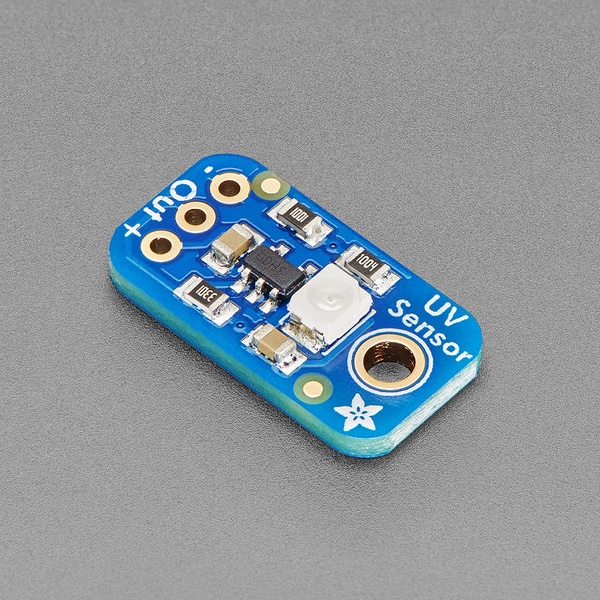
Points at the sky (or a UV lamp) and outputs an analog voltage proportional to ultraviolet light intensity. Map that to a UV index reading and you've got a sunscreen-reminder gadget or a plant-light monitor. Read the analog pin and convert using the sensor's datasheet formula — no library needed. Photo credit: adafruit licensed under CC BY-NC-SA 2.0
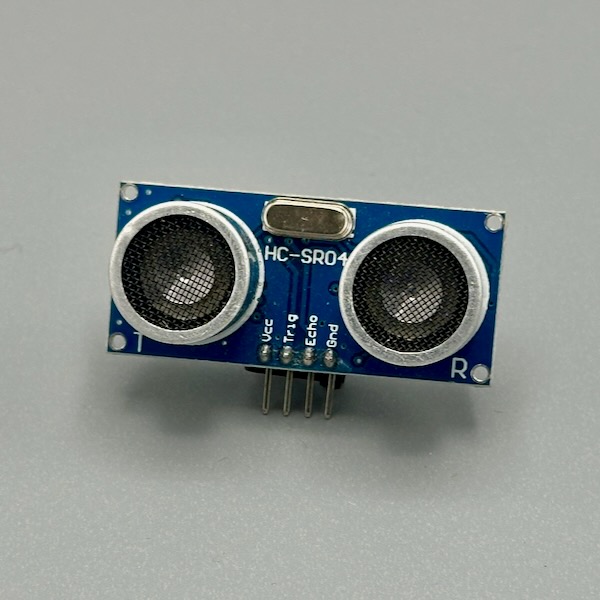
Sends out an ultrasonic ping and times the echo — distance equals (time × speed of sound) / 2. Mount it on a servo to scan a room, point it down a hallway for proximity detection, or hang it above a box to measure how full it is. Needs two pins: TRIG to fire and ECHO to listen. Photo credit: Steve Turbek
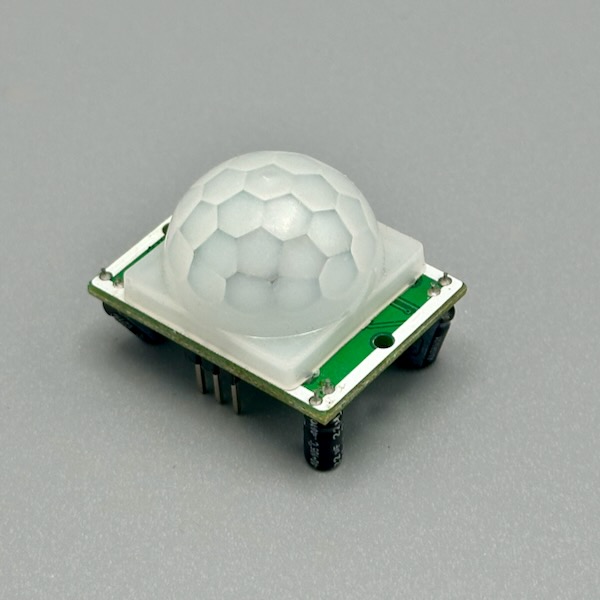
The white dome focuses infrared radiation from warm bodies onto a sensor that fires when heat shifts across its field of view — it's seeing your body heat, not your silhouette. Outputs a simple HIGH when motion is detected. Two onboard potentiometers let you tune sensitivity and how long the HIGH signal holds after motion stops. Perfect for presence-triggered interactions. Photo credit: Steve Turbek
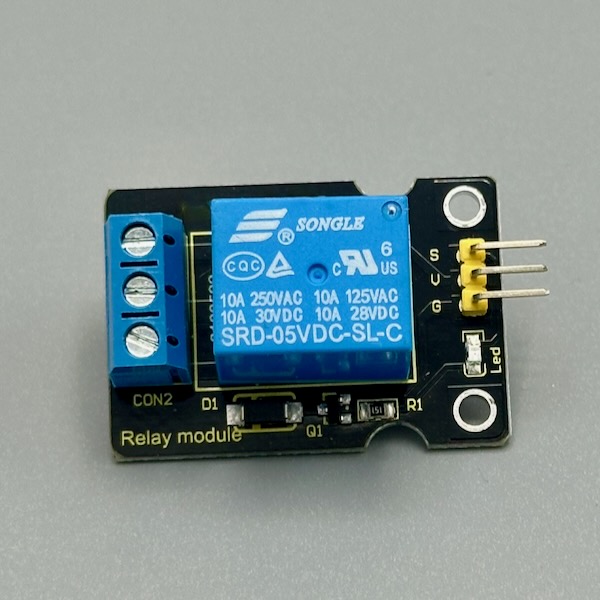
A relay is a tiny electrically-controlled switch that lets a microcontroller flip circuits carrying far more power than the board can handle directly — mains voltage, motors, lights, anything. One digital pin fires a coil that physically closes a contact. Great for automating a lamp, controlling a pump, or any "real world" switching project. Treat high-voltage wiring with appropriate caution. Photo credit: Steve Turbek
Wave a magnet near it and the digital output flips — no physical contact required. Hide one inside an object and put a magnet on a lid, door, or spinning wheel. Great for counting rotations on a wheel, detecting drawer open/close, or making a completely concealed switch under a table surface. Works with any standard refrigerator magnet. Photo credit: Steve Turbek
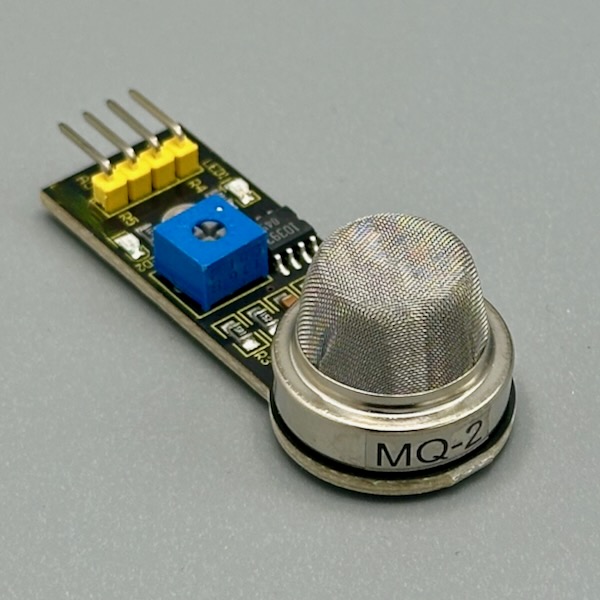
Sensitive to LPG, propane, methane, hydrogen, and smoke — the resistance of its heating element changes in the presence of combustible gases and you read that on an analog pin. Needs a 2-minute warm-up time before readings stabilize. The onboard potentiometer sets a threshold for the digital output. Needs 5V — not 3.3V friendly without a level shifter. Photo credit: Steve Turbek
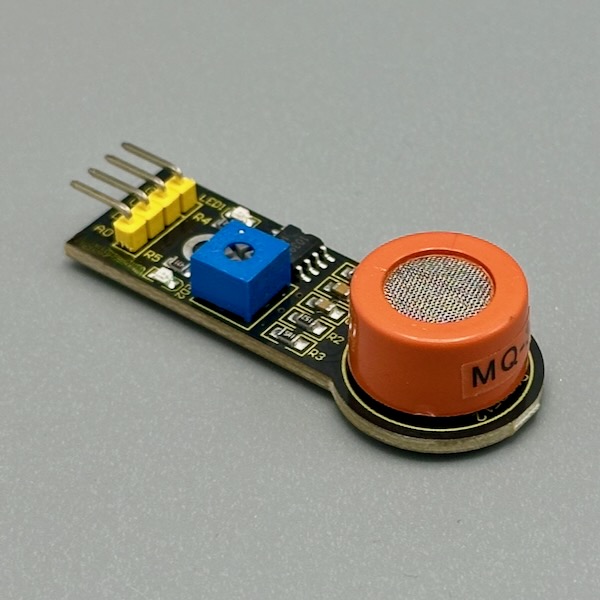
Breathe near it and the analog output climbs. The sensing element reacts to ethanol vapor — higher concentration, lower resistance, higher analog reading. Calibrate it with a known source for real measurements, or use the raw value for relative detection. Great for a theatrical breathalyzer prop or a fermentation monitor. Needs 5V power and a warm-up period. Photo credit: Steve Turbek
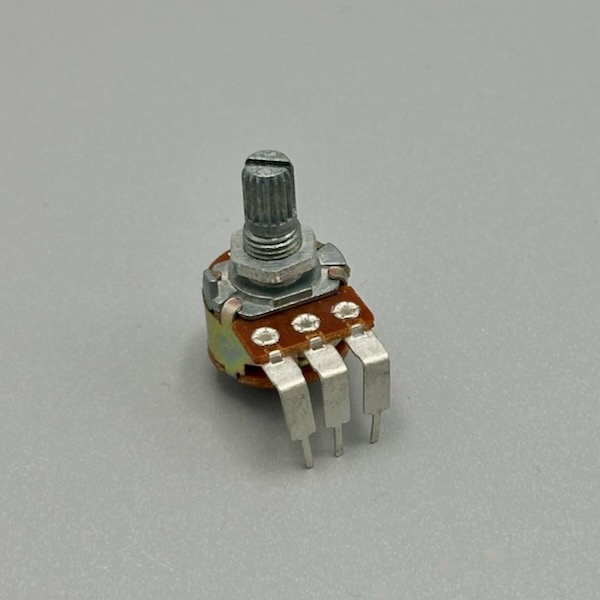
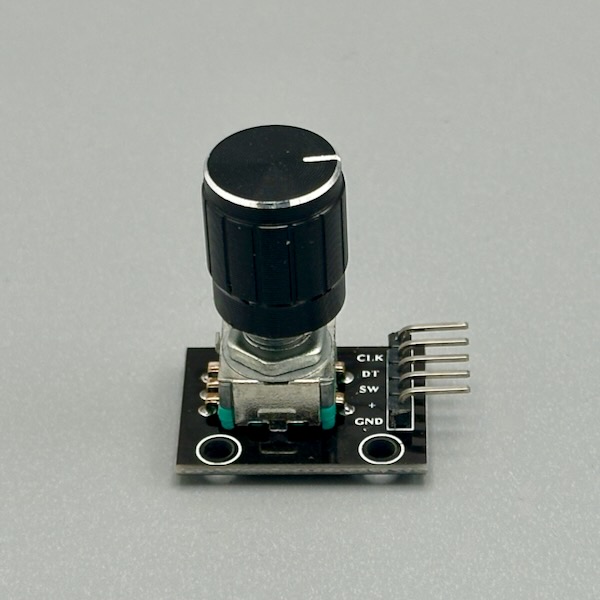
The simplest analog input: turn the shaft, change the resistance, read a value from 0–1023. Wire the two outer legs to power and ground, the middle wiper to an analog pin. Use it for volume, brightness, speed, position — anything with a continuous range. Available in panel-mount knob versions, tiny trim pots for calibration, and breakout modules with three labeled pins. Photo credit: Steve Turbek
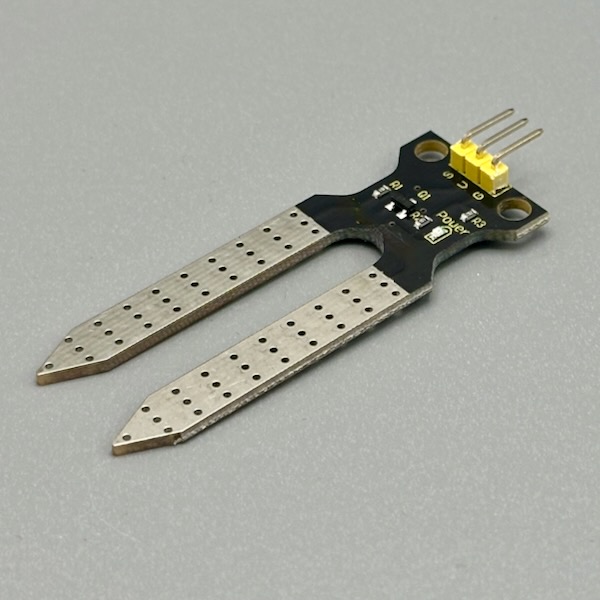
Stick the two prongs into soil and read the analog output — dry soil gives a high value, wet soil a low one (or vice versa depending on the module). Thresholds vary by soil type, so calibrate by noting the reading when dry and when soaked. Perfect for a plant-watering alarm, an automatic irrigation trigger, or just proving that you forgot to water something. Photo credit: Steve Turbek
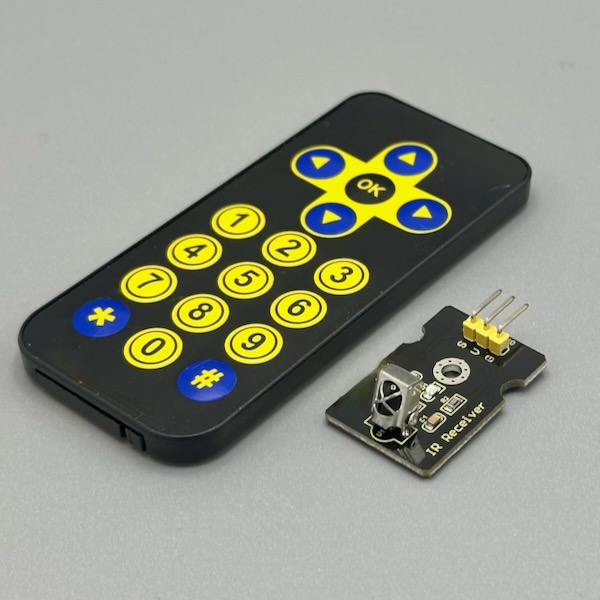
Point any TV remote at the receiver and capture the code — then replay it with the IR LED to control the device yourself. The IRremote library decodes dozens of protocols automatically. Use it to let your project hijack a TV, trigger a camera, or build a universal remote. The receiver is the three-pin sensor; add a high-power IR LED for transmission. Photo credit: Steve Turbek
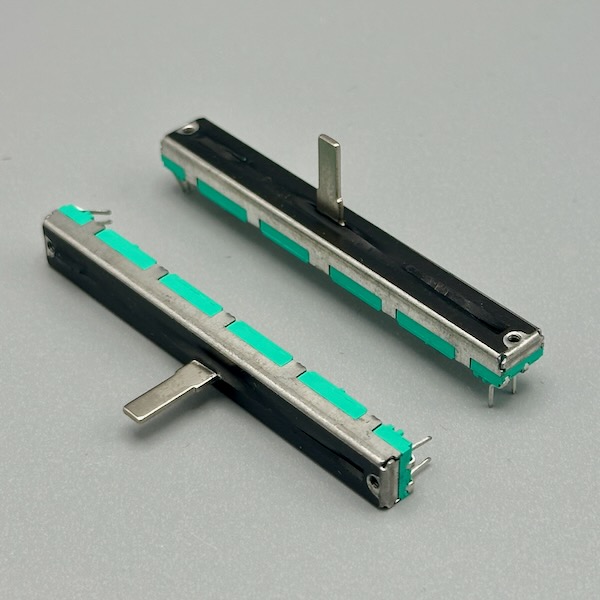
A fader instead of a knob — slide the wiper along a track and the resistance changes linearly. Audio mixers, brightness sliders, and synthesizer filter cutoffs all use this form factor because it lets users see position at a glance. Wire it like a rotary pot: outer pins to power and ground, center wiper to an analog input. Great for any parameter that needs a "how much" gesture. Photo credit: Steve Turbek
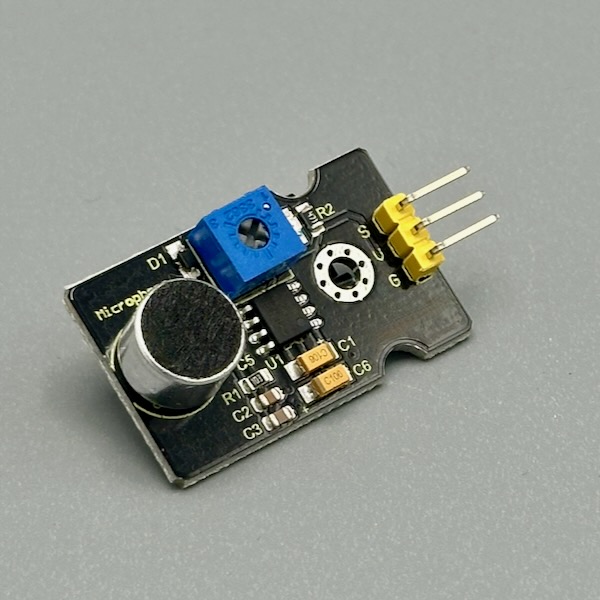
A small electret microphone with a built-in amplifier that outputs the sound level on an analog pin — louder sounds give higher readings. The digital output fires HIGH when the level crosses a threshold set by the onboard potentiometer. Use it to clap-trigger an action, visualize sound levels as a bar graph, or detect when something in the room makes noise. Not suitable for recording — just detection and level sensing. Photo credit: Steve Turbek
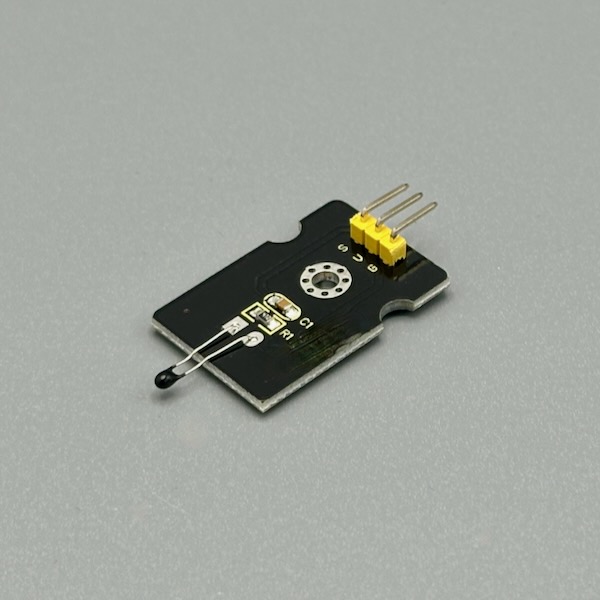
An analog temperature sensor on a breakout — resistance changes with temperature, and the module outputs a voltage proportional to the reading. Read the analog pin, apply a conversion formula, and you have degrees in Celsius. Simpler than the DHT11 (no protocol, just analogRead), and more responsive to quick temperature changes. Good for ambient monitoring, thermal feedback, or heat-detection interactions. Photo credit: Steve Turbek

Slot a coin in and the sensor fires a pulse on a signal pin — each coin type can be calibrated to produce a specific number of pulses. Use it to gate access, add a "pay to play" mechanic to a game, or just because coins dropping is a satisfying interaction that players already understand intuitively. Requires 12V for the coin mechanism; level-shift the signal down to 3.3V or 5V for your microcontroller. Photo credit: Steve Turbek
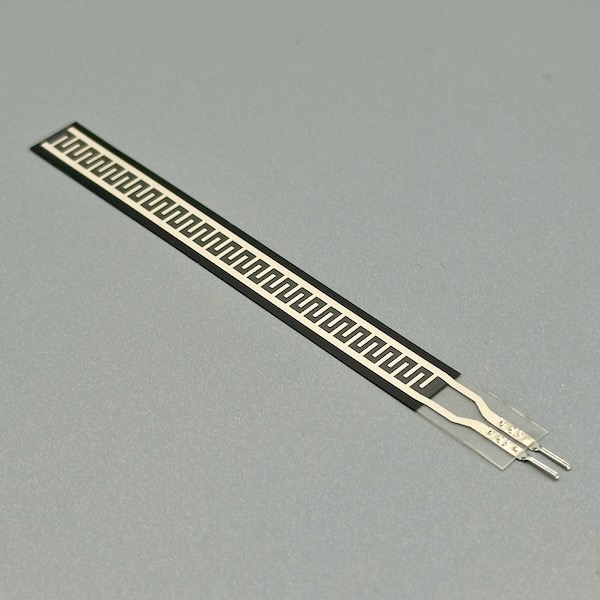
Bend it and the resistance increases — straighten it and resistance drops back. Tape one to a finger joint and you've got a gesture sensor; attach it to a hinge and it measures angle. Use it in a voltage divider with a 47kΩ resistor and read the analog output. Fragile at the connection point, so strain-relieve the leads before flexing repeatedly. Photo credit: Steve Turbek
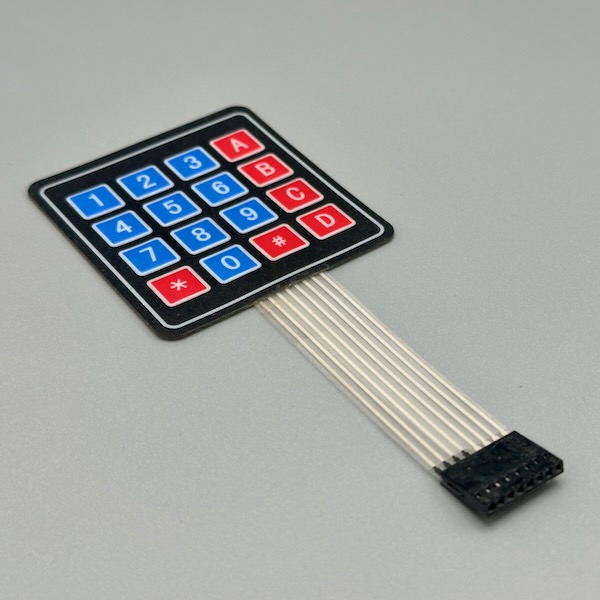
Sixteen keys (or 12 on the numeric version) in a flat, flexible sheet that presses onto any surface. The Keypad library handles the matrix scanning for you — just define which pins are rows and columns and call keypad.getKey() in your loop. Use it for PIN entry, command shortcuts, instrument pads, or anywhere you want buttons without taking up 3D space. The adhesive backing sticks it anywhere. Photo credit: Steve Turbek
Switches & Buttons
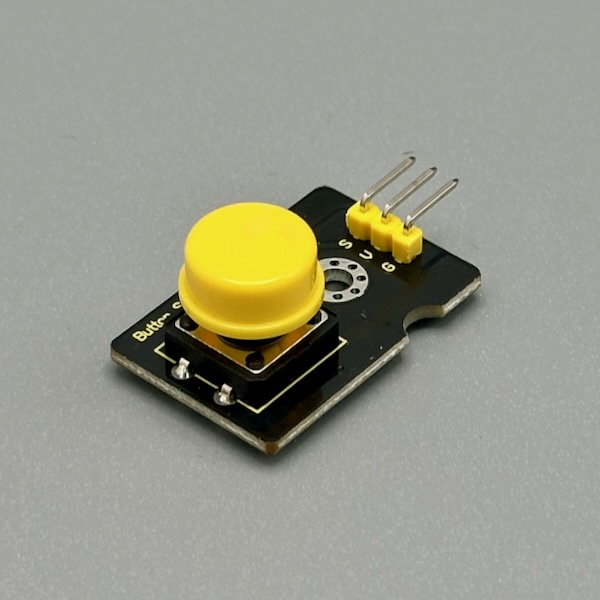
A momentary pushbutton on a tiny breakout board with a built-in pull-up resistor — so it reads HIGH at rest and LOW when pressed. Wire it to any digital pin and digitalRead() it. The module form means no breadboard fussing and no floating pins. Perfect as a trigger, a reset, or a "go" button for any project. Photo credit: Steve Turbek
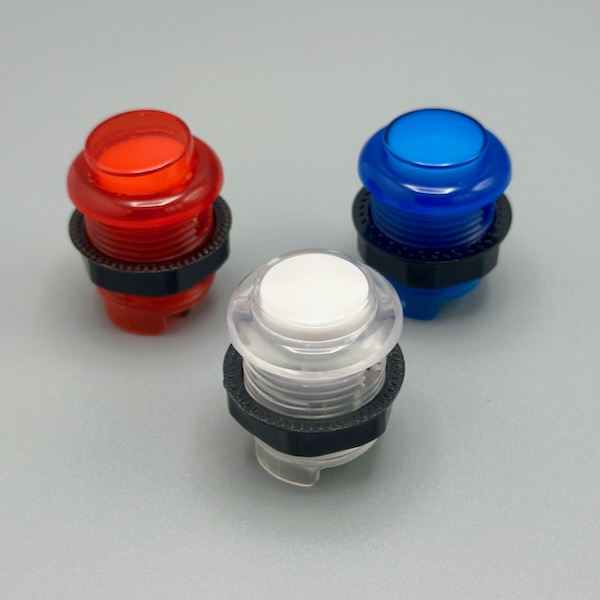
The same buttons in arcade cabinets — large, loud, and deeply satisfying to press. Available in a rainbow of colors and most versions have an LED ring you can illuminate independently from the switch. They mount through a 28–30mm panel hole and connect to a microswitch inside with standard quick-connect terminals. The physical confidence of pressing one makes any interactive project feel serious. Photo credit: Steve Turbek
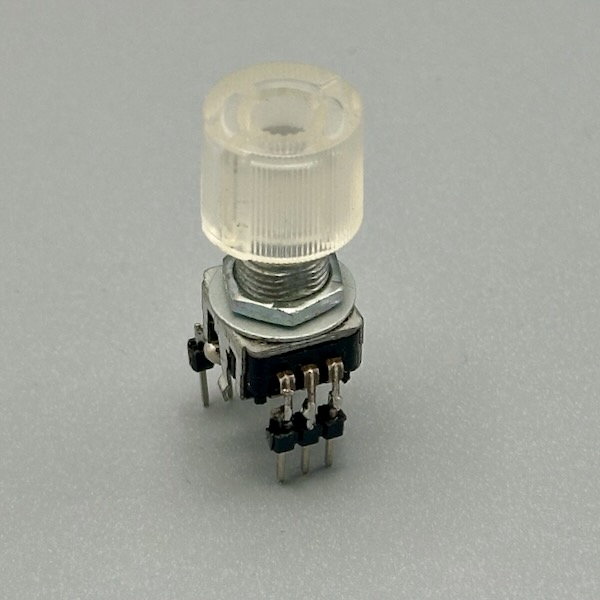
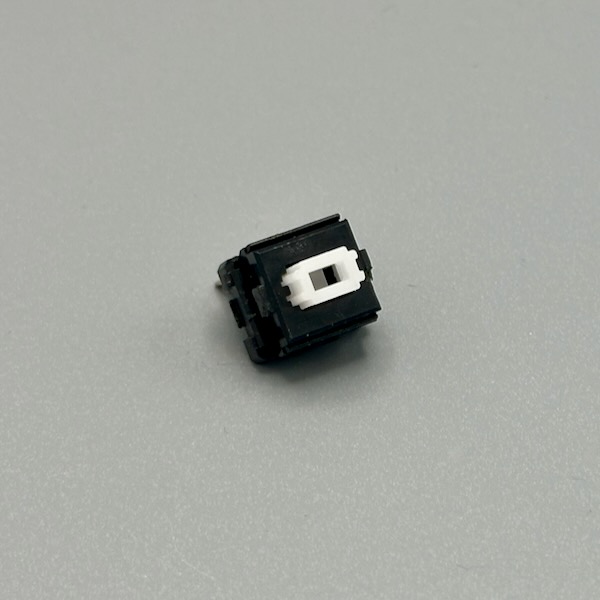
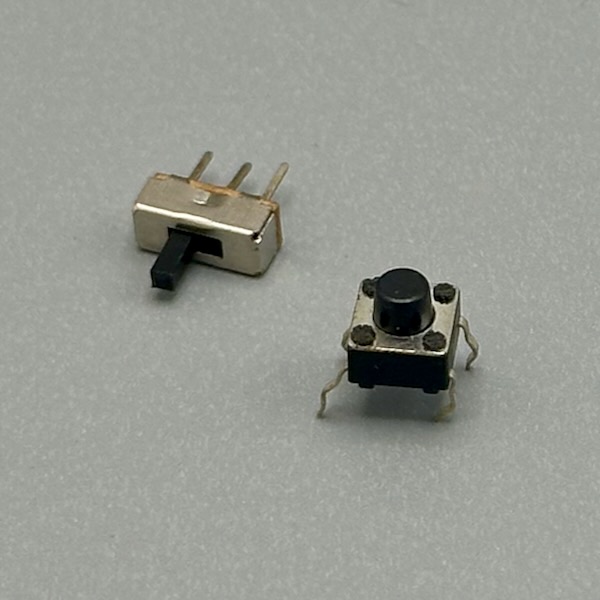
A satisfying tactile switch with a distinct click that confirms every press without looking down. Breadboard-friendly pins and a small footprint make it the go-to for prototyping any button input. The click is the feature — it tells users their input registered without any software feedback needed. Photo credit: Steve Turbek
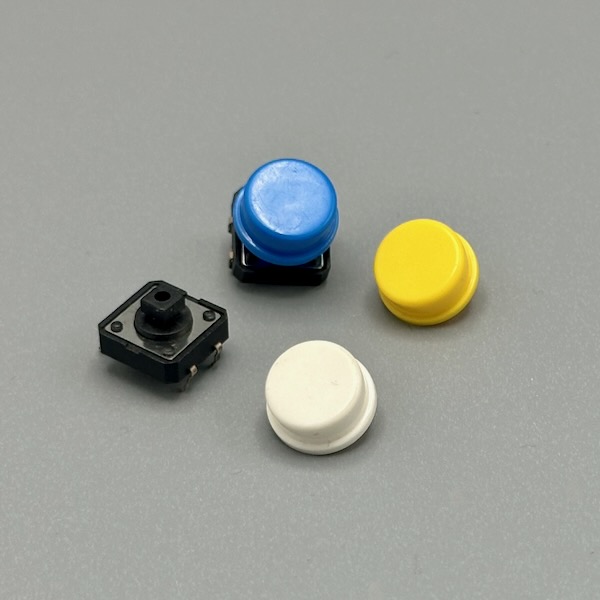
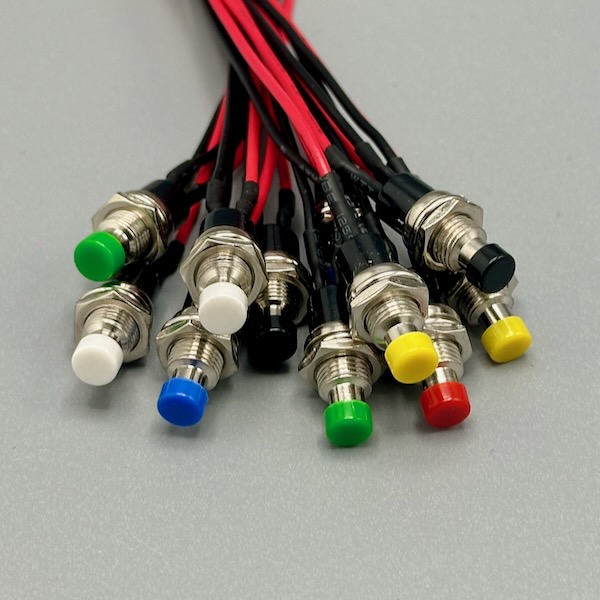
A mixed bag of momentary push buttons in different cap colors and heights. Color-code your inputs without any labeling — green for go, red for stop, yellow for mode. All share the same 4-pin footprint that straddles the center gap of a breadboard. Keep an assortment on hand because every project eventually needs a button, and matching colors makes schematics easier to read. Photo credit: Steve Turbek

Only operates with a physical key, which makes it perfect for admin controls, activation sequences, or any interaction that should feel deliberate and authorized. Typically a two-position switch (off/on) — wire it like any toggle switch to a digital input with a pull-up resistor. The theater of pulling out a key and turning it adds real-world gravity to whatever action it triggers. Photo credit: Steve Turbek
The switches inside mechanical keyboards — available in clicky (Blue), tactile (Brown), and linear (Red) variants. Each press has precise actuation force and travel distance. Solder them to a PCB or hot-swap socket, or use a breakout module. Make custom keyboards, control panels, or musical instruments with the most ergonomic and durable switches available. They're rated for 50–100 million keypresses. Photo credit: Steve Turbek

The long metal arm acts as a lever — a small physical contact at the tip triggers the switch with very little force, even from moving parts or passing objects. These are how 3D printers detect end stops and vending machines detect product. Mount one at the edge of a drawer, along a track, or where a mechanism should stop. The lever amplifies tiny mechanical events into clean digital signals. Photo credit: Steve Turbek
A precision snap-action switch with a sharp, definite click at a consistent actuation point — once force reaches the threshold, the contacts snap over instantly regardless of how slow you push. Common in mice, appliances, and mechanical limit detectors. The small body mounts in tight spaces; three terminals give you both normally-open and normally-closed operation from the same switch. Photo credit: Steve Turbek
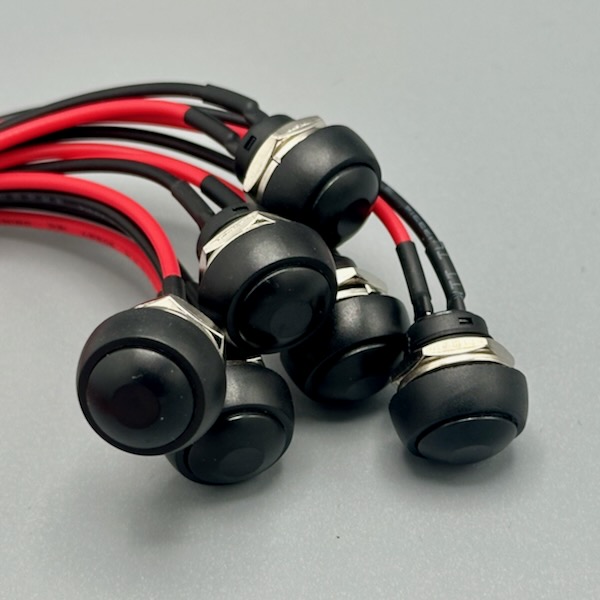
A panel-mount button that makes contact only while held down — release it and the circuit opens again. Available in normally-open (NO) and normally-closed (NC) variants. Screw it into an enclosure panel for a finished-product feel. Wire it with a pull-up resistor and read it as a digital input, or use it to trigger a relay directly. The panel-mount form turns any project into something that looks intentionally designed. Photo credit: Steve Turbek
The switch inside a telephone handset cradle — it closes when the handset is placed down (on-hook) and opens when lifted (off-hook). Salvaged from old phones or bought new, these are great for building telephone-themed interfaces or any project where lifting an object should trigger an action. The satisfying weight of a handset makes it an inherently theatrical input. Photo credit: Steve Turbek
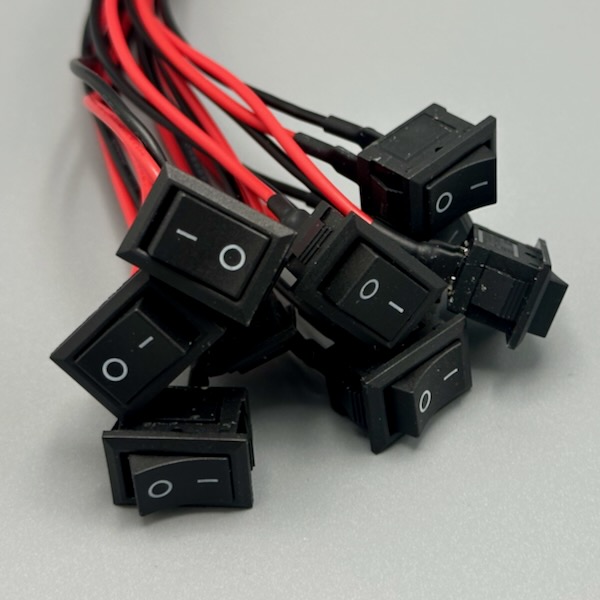
A latching switch that stays in position — flip it on and it stays on until you flip it off. The rocker and toggle form factors are universal shorthand for "this controls power," which is useful when you want users to understand the on/off state without any screen or indicator. Panel-mount versions add a finished look to any enclosure. Check the voltage and current rating before wiring to anything beyond low-voltage DC. Photo credit: Steve Turbek
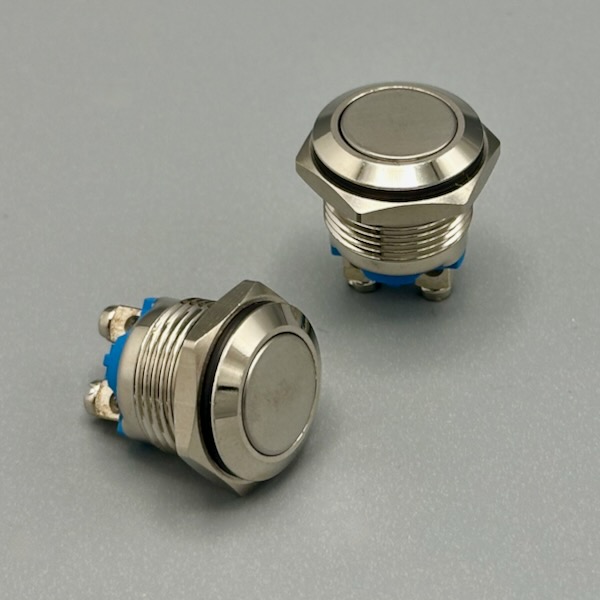
Built for outdoor kiosks and rough handling — the stainless steel body is waterproof, corrosion-resistant, and basically indestructible. The metal face gives a premium, industrial aesthetic that's perfect for panels meant to look serious. Often available with an illuminated ring. Wires the same as any momentary button; the IP67 or IP68 rating means it works in rain, humidity, or a splash-prone environment. Photo credit: Steve Turbek
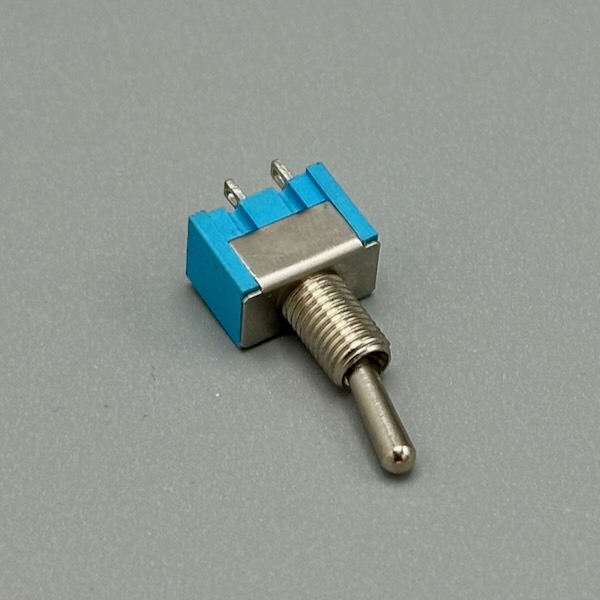
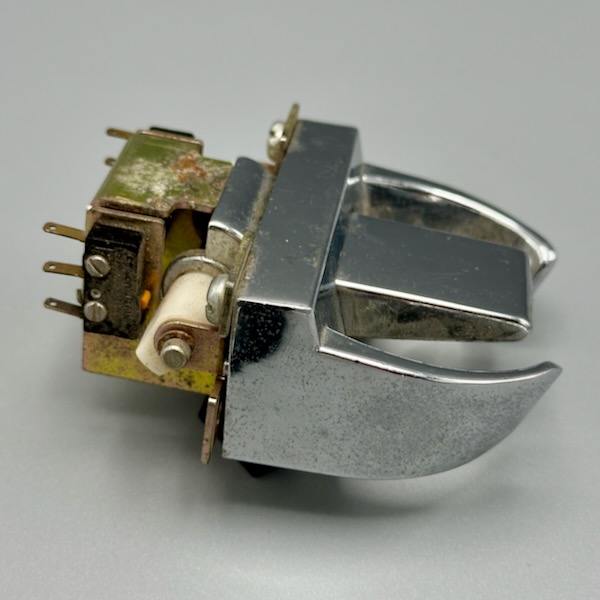
Flip up for on, flip down for off — the position is unmistakably readable at a distance. A latching switch means it holds state without you holding it, unlike a momentary button. Panel-mount, two or three position, and available with safety covers that require flipping open before switching. The toggle switch is the universal language of "I am controlling something important," which makes it great for theatrical interfaces. Photo credit: Steve Turbek
Displays & Screens
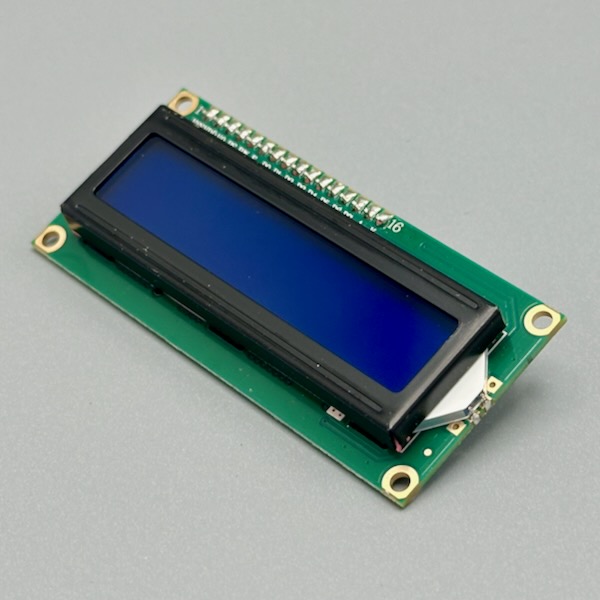
Two rows of 16 characters — enough for a status readout, a sensor value, a short message, or a lo-fi game. The I2C backpack on the back reduces wiring to just two signal wires (SDA + SCL). Use the LiquidCrystal_I2C library: lcd.print("Hello!") and it appears instantly. Backlight color and contrast are adjustable. Photo credit: Steve Turbek
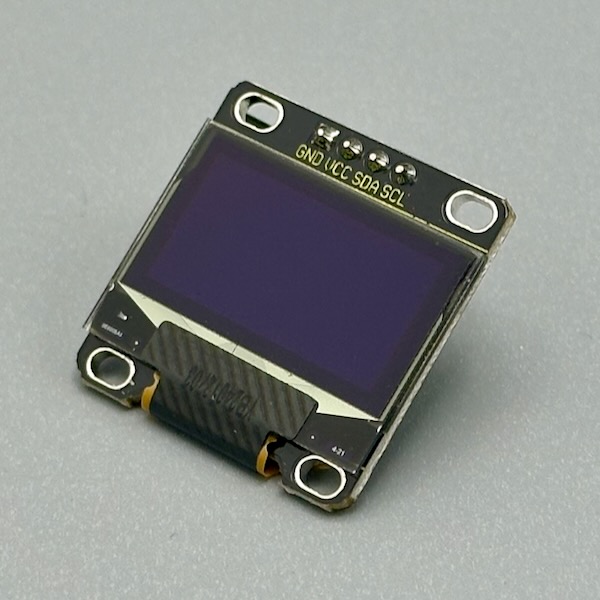
Tiny, sharp, and self-lit — no backlight needed because each pixel glows on its own. At 128×64 pixels you can draw text in multiple sizes, icons, graphs, and even simple animations. Talks over I2C so it only needs two wires. The Adafruit SSD1306 library makes drawing shapes and text straightforward. Works great at 3.3V or 5V. Photo credit: Steve Turbek
Lights & LEDs
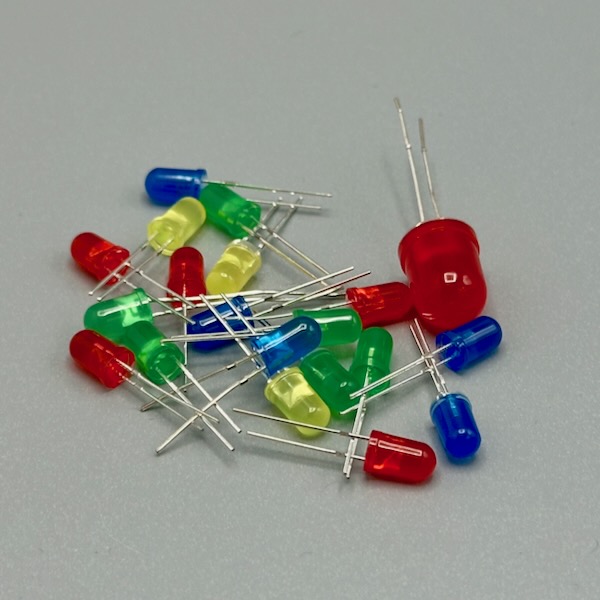
The simplest output component: apply voltage above the forward voltage and it lights up. Always use a current-limiting resistor in series (220Ω for 5V, 68Ω for 3.3V is a safe start). Standard single-color LEDs indicate states; RGB LEDs mix color; diffused ones spread light evenly; clear ones are directional. Available in every size from 3mm to 10mm and in addressable strips. Photo credit: Steve Turbek
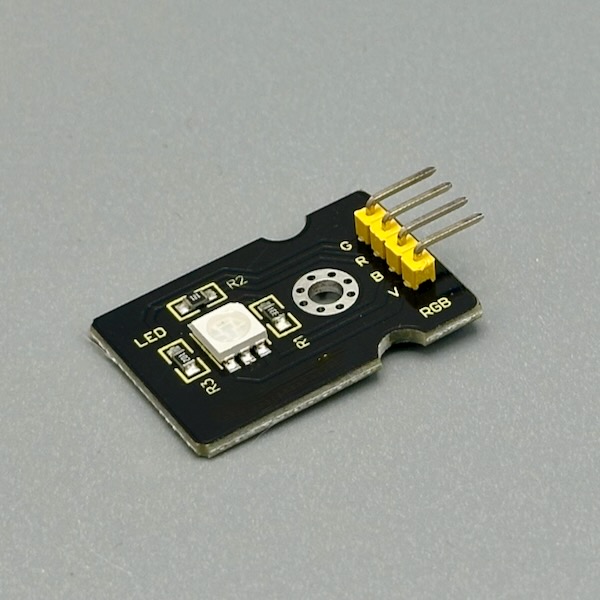
Three LEDs in one tiny package — red, green, and blue — each on its own pin. Mix values to dial in any color you want, or cycle through hues to indicate states without needing a screen. Wire each pin through a 220Ω resistor and control them independently with PWM for smooth color mixing. Photo credit: adafruit licensed under CC BY-NC-SA 2.0
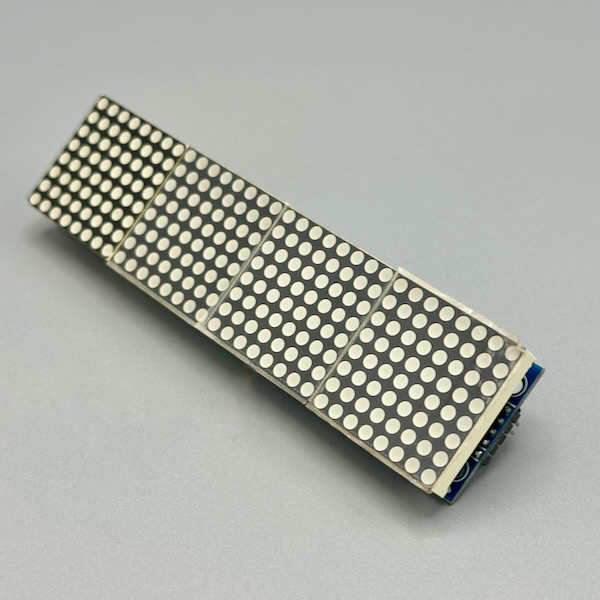
64 LEDs wired in a matrix and driven by a MAX7219 chip that handles all the multiplexing — you just send it what to display over SPI. Chain multiple modules to make a scrolling sign. The LedControl library makes displaying characters and patterns straightforward. Great for emoji faces, scrolling text, game boards, or visual feedback that's bigger than an OLED but still readable from across a room. Photo credit: Steve Turbek
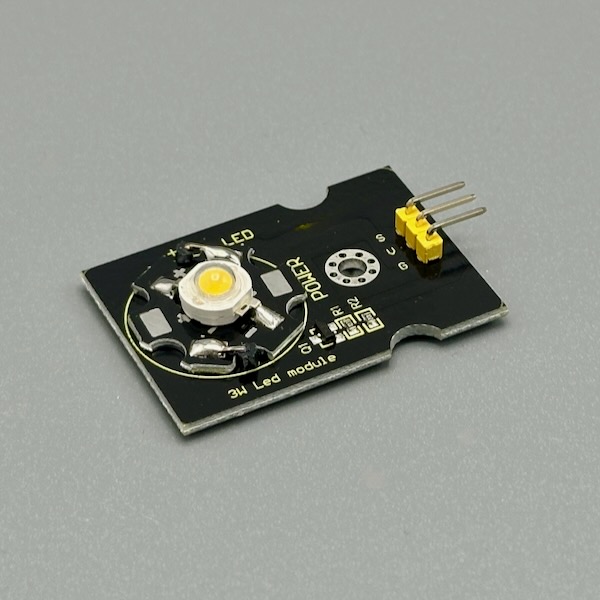
A full 3 watts of LED — dramatically brighter than a standard indicator LED and meant for actual illumination. Needs a current driver circuit (not just a resistor) and gets hot enough to need a heat sink for sustained use. Drive it with a MOSFET transistor from a PWM pin for dimmable control. Great for flashlights, spotlight effects, or any project where you need real light output. Photo credit: Steve Turbek
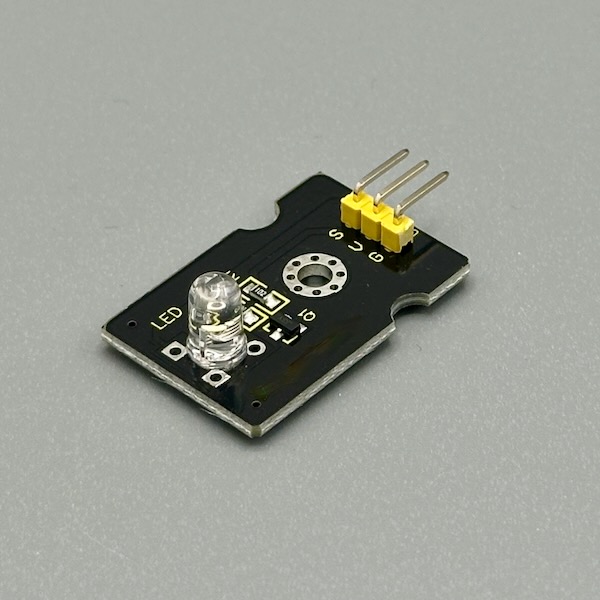
A white LED on a small module with a built-in current-limiting resistor — just connect VCC, GND, and a signal pin. Write HIGH to turn it on, LOW to turn it off, or use PWM for dimming. The module form makes it easy to mount and wire without worrying about resistor values. Use it as a flashlight, a status indicator, or a light source for a sensor. Photo credit: Steve Turbek
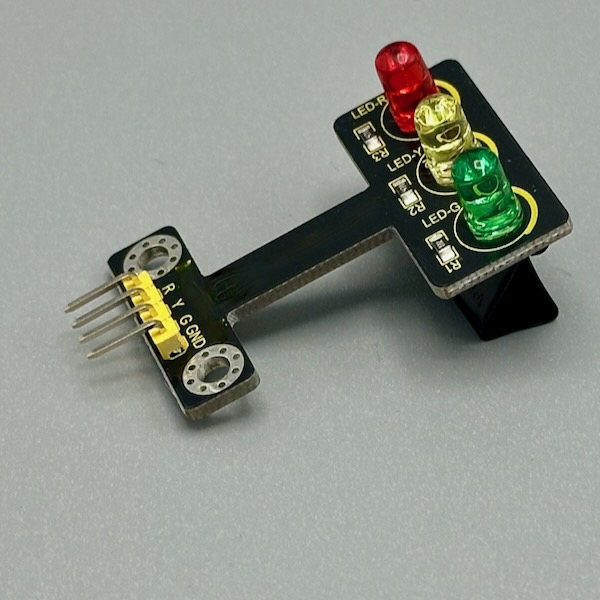
Three LEDs in a vertical stack — red on top, yellow in the middle, green at the bottom — each on its own pin. It's a traffic light prop and a ready-made three-state indicator at the same time. Great for showing system states, coding a traffic light simulation, or adding a physical status display to any project. Each LED has its own resistor on the module. Photo credit: Steve Turbek
Motors & Servos
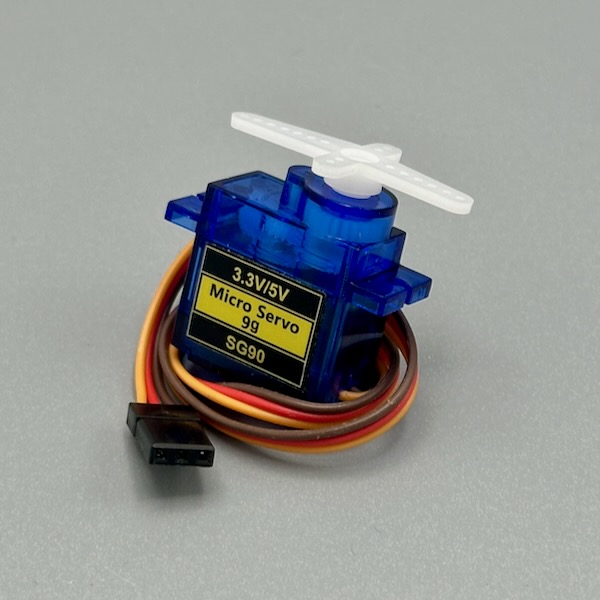
Tell it an angle and it goes there — that's it. Internally it's a motor with a gearbox and a position sensor all in one tidy package. The Servo library on Arduino makes it a one-liner: servo.write(90) puts it at center. Use it to point a finger, open a lid, steer a vehicle, or waggle something dramatically in response to a sensor. Photo credit: Steve Turbek
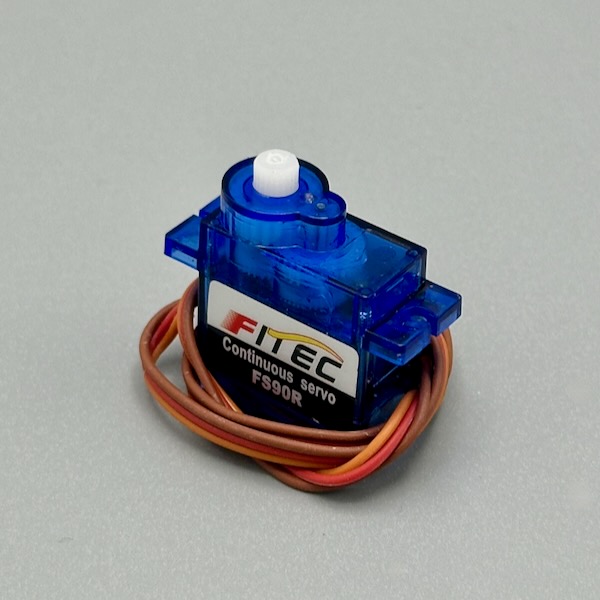
Looks like a standard servo but instead of rotating to an angle, it spins continuously — the signal value controls speed and direction. Write 90 to stop, below 90 to go one way, above 90 to go the other. No encoder, so it's open-loop (doesn't know where it stopped). Perfect for wheels on a small robot, a conveyor belt, a slow-turning display platform, or a winding mechanism. Photo credit: Steve Turbek
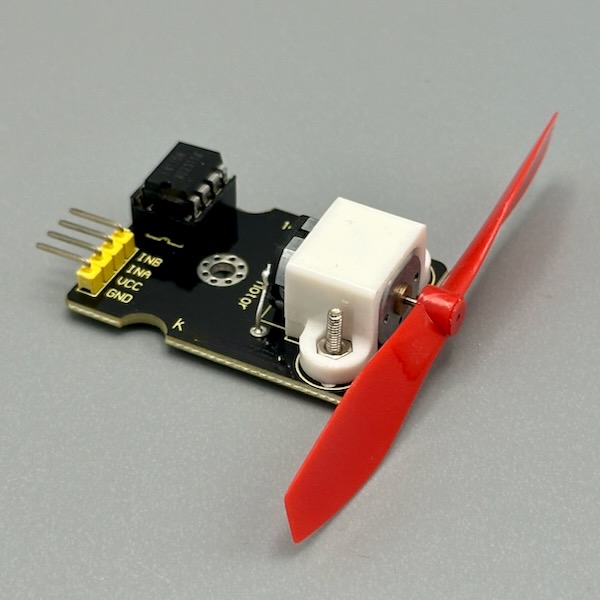
A DC motor with a propeller blade — control the speed with PWM from a digital pin (through a transistor or motor driver, never directly from an MCU pin). Great for cooling, airflow, creating wind effects, or as a simple actuator for kinetic projects. The fan makes speed changes immediately visible and audible, which is satisfying for interactive demos. Photo credit: Steve Turbek
Microcontrollers
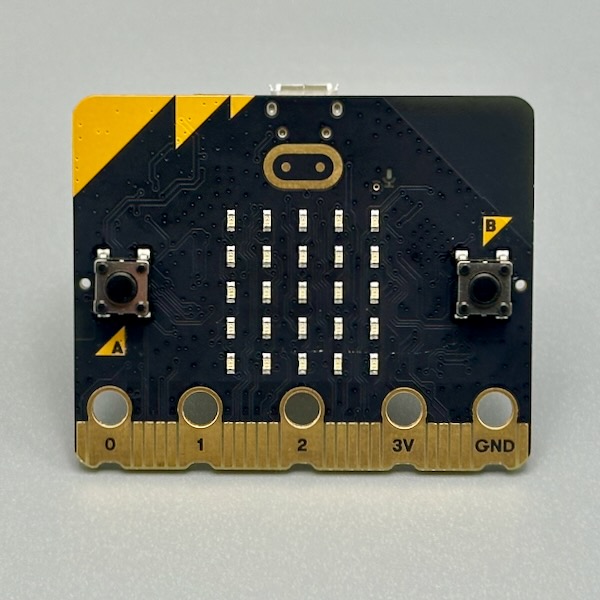
Designed for education, it's packed with built-in sensors — a 5×5 LED display, two buttons, accelerometer, magnetometer, and Bluetooth. Program it with block code in MakeCode or with MicroPython. The edge connector at the bottom exposes GPIO, power, and ground on large pads you can clip alligator leads directly to. Breakout boards expose all 19 pins as standard 0.1" headers. Photo credit: Steve Turbek
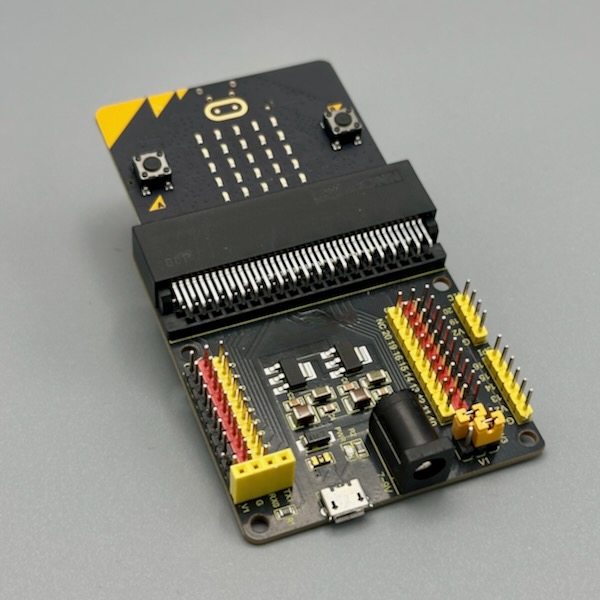
The micro:bit's edge connector has 19 GPIO pins, but most are only accessible via small pads that are hard to connect to. These breakout boards clip onto the edge and expose every pin as standard 0.1" header pins — ready for breadboards, jumper wires, or shields. Different form factors suit different projects: some are compact, some include a breadboard area, some add extra features like battery connectors. Photo credit: Steve Turbek
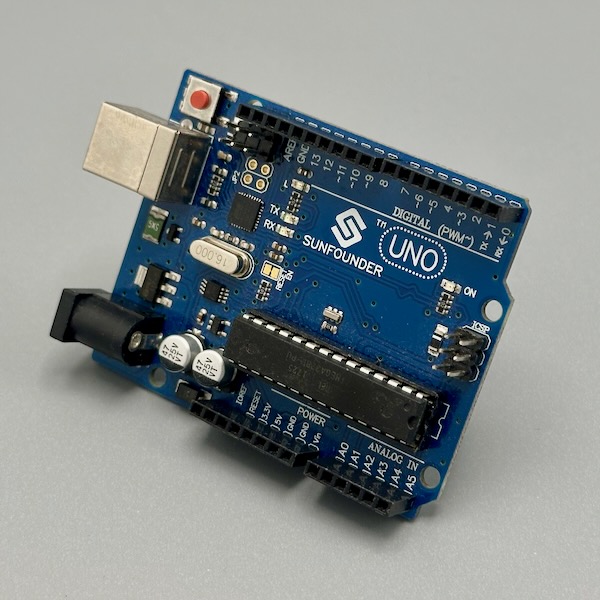
The classic beginner board and still the most documented microcontroller on earth. 14 digital I/O pins, 6 of which support PWM, plus 6 analog inputs. Runs at 5V which means it plays nicely with most sensors and modules out of the box. Plug in USB, open the Arduino IDE, and you're uploading code in under a minute. Every sensor library on the planet lists "tested with Uno." Photo credit: Steve Turbek
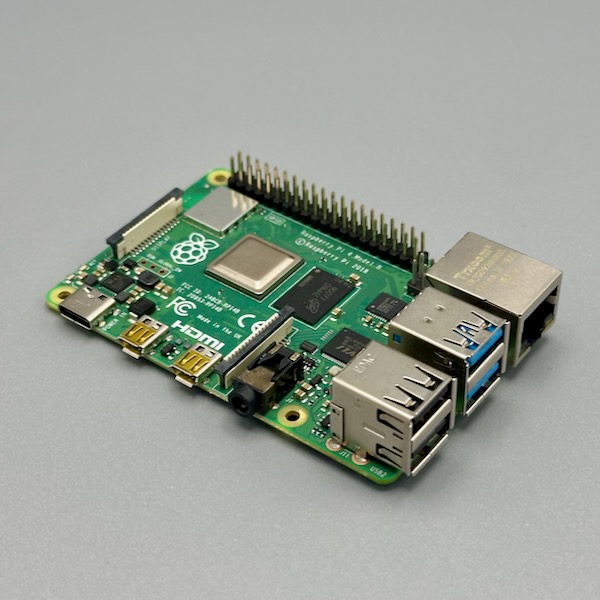
Not a microcontroller but a full computer in credit-card form — runs Linux, has USB ports, HDMI output, Wi-Fi, and 40 GPIO pins. When your project needs networking, a display, machine learning, or you want to write Python instead of C, this is your board. GPIO pins run at 3.3V so use level shifters with 5V components. Pair it with an Arduino for hard real-time sensor work. Photo credit: Steve Turbek
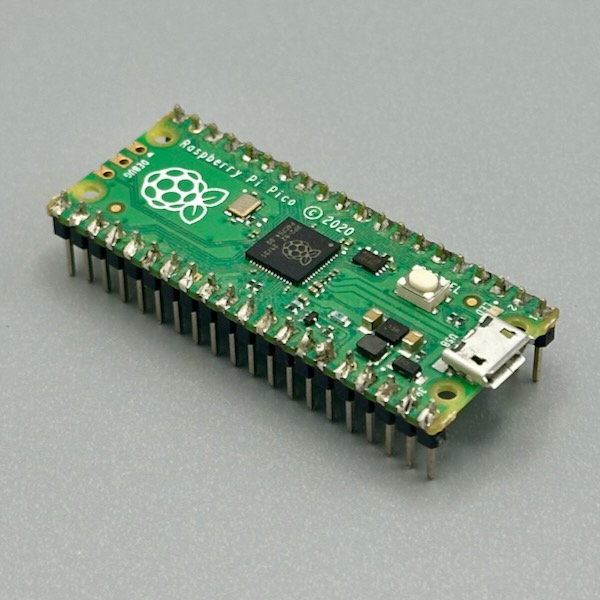
Tiny, cheap, and programmable in MicroPython — drag a .py file onto it like a USB drive and it runs. The RP2040 chip has dual cores and programmable I/O (PIO) hardware that can handle custom protocols without tying up the CPU. 26 multi-function GPIO pins, ADC, I2C, SPI, UART. The Pico W adds Wi-Fi. Great when you want Python but don't need a full Linux OS. Photo credit: Steve Turbek
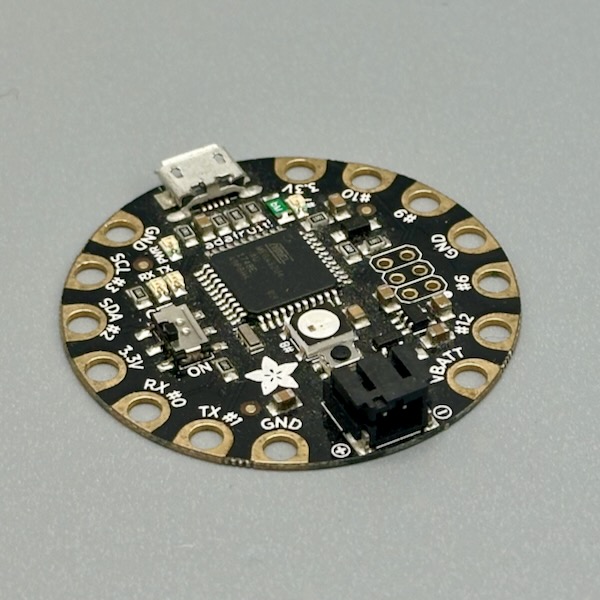
Round, flat, and designed to be sewn into fabric — the pads are large enough for conductive thread and there are no sharp corners to poke through clothing. Runs the Arduino environment, compatible with NeoPixels, and has built-in USB. Makes wearable electronics approachable without traditional soldering. Pair with Flora-compatible sensors (also sew-able) for costume and textile projects. Photo credit: Steve Turbek
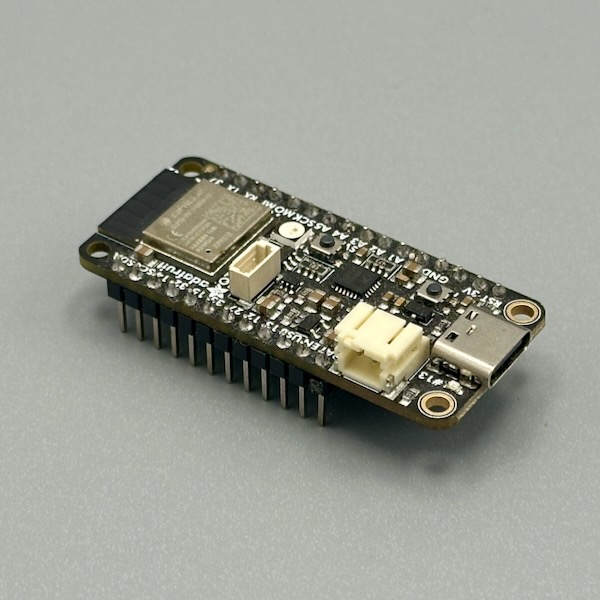
The Feather ecosystem is Adafruit's standardized form factor — boards and Wings (add-ons) all share the same footprint and stack together. The ESP32 version brings Wi-Fi and Bluetooth on top of Arduino compatibility and pins. Built-in LiPo battery charging makes it ideal for wireless sensor nodes. The combination of connectivity, ecosystem, and battery support is hard to beat. Photo credit: Steve Turbek
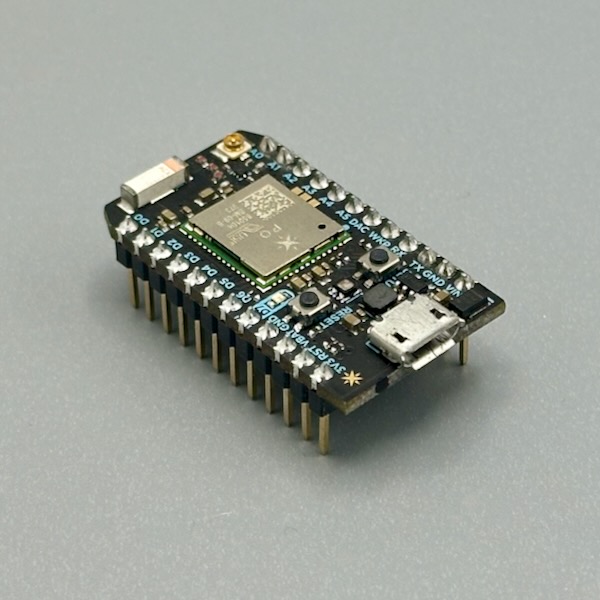
Built around cloud connectivity from the start — every Photon has a device ID and connects to Particle's cloud over Wi-Fi, letting you expose functions, read variables, and publish events from anywhere with a few lines of code. Program it with the Particle Web IDE or local tools. Great for projects that need to talk to the internet without setting up your own server infrastructure. Photo credit: Steve Turbek
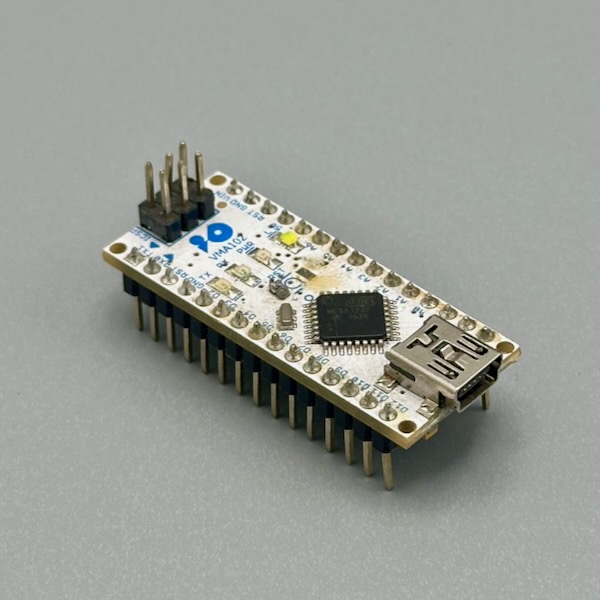
A compact Arduino-compatible board that fits neatly across a breadboard, leaving rows on each side for connections. Same ATmega328P as the Uno but in a much smaller package. Great when you've outgrown prototyping on a full-size Uno and want to make something more compact without switching to a different ecosystem. USB-Micro for programming, and most Arduino libraries work unchanged. Photo credit: Steve Turbek
The Basics
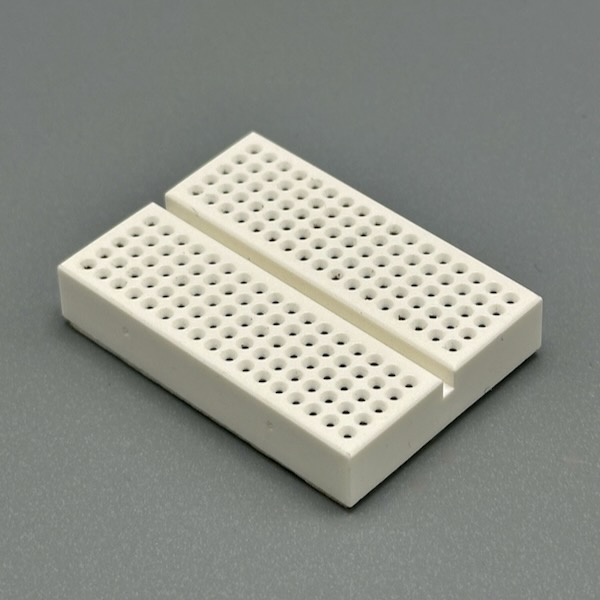
Rows of holes connected internally let you build circuits without soldering — just push components and wires in. The outer rails run the length of the board for power and ground distribution; the inner rows connect five holes at a time. Mini breadboards are great for tight spaces; half-size ones give room for a microcontroller plus several components. When you're done, everything pulls out and you start over. Photo credit: Steve Turbek
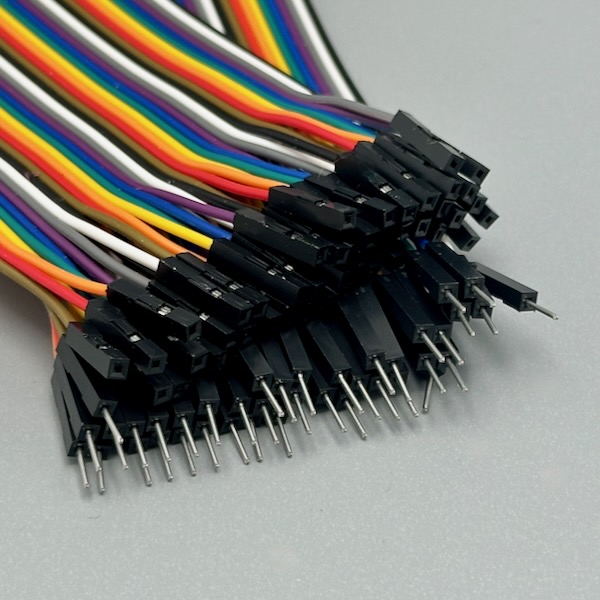
The humble jumper wire — but get the rainbow set and your breadboard circuits become readable at a glance. Use red for power, black for ground, and consistent colors for signal types. They come in plug-to-plug (breadboard-to-breadboard), plug-to-socket (breadboard-to-module header), and socket-to-socket (module-to-module). Keeping a sorted set saves more debugging time than you'd expect. Photo credit: Steve Turbek
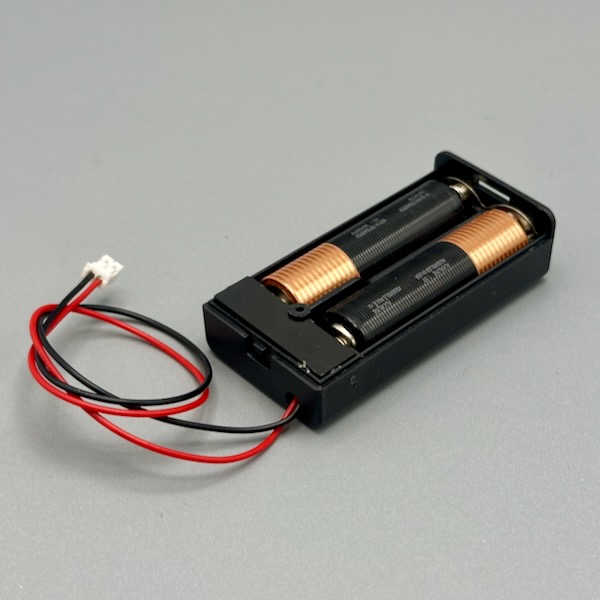
Four AA batteries in series give you 6V and enough current to run motors, servos, or sensors that need more than a USB port can supply. The built-in switch makes it easy to cut power without unplugging anything. Use a voltage regulator if your circuit needs a steady 5V. Alkaline AAs are cheap and widely available; rechargeable batteries drop to ~4.8V but last longer. Photo credit: Steve Turbek